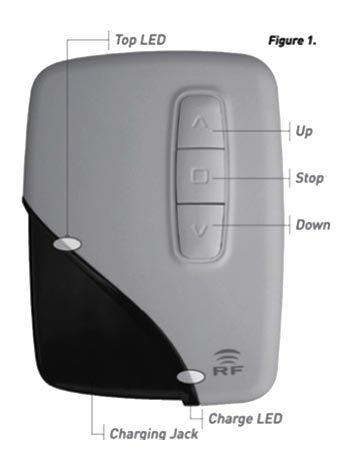
The E-Port control is the cornerstone to this Rechargeable Drive System and the information below is an aid to diagnosing the various signals that the two LEDs on the 18650 E-Port can display. If the up or down button is pressed with the controller in a wallplate connected to a motor the TOP LED should light up for a few seconds to indicate that motor drive is occurring. If the up or down button is pressed with the controller out of a wallplate the TOP LED should flash to indicate the controller is trying to drive but there is no load.
When a charger is plugged directly into the bottom of the controller the CHARGE LED will always illuminate (even if for a few seconds) to show that power is available to the controller when required. The charging condition can be tested using the information detailed at point below.
The Controller may be in sleep mode. To “wake” it up plug a charger directly into the charging jack on the bottom of the controller. Ensure that the charger is plugged in and switched on. The CHARGE LED should light up to indicate charging is occurring.
This indicates that the controller needs Charging. A full charge will require approximately 8 hours.
This indicates that the controller is trying to drive a motor. Fit the controller to a wallplate and try to drive a motor.
This indicates that the controller is in ERROR MODE. The controller monitors the charging circuit and if it detects a problem will enter error mode. The controller cannot be used in this state and should be removed from any charging source. A service call will be required to investigate the controller. The problem in the charging circuit is most probably a short circuit within the wallplate so this will need to be investigated. Obvious things to check for are wire whiskers on the motor loom, metal swarf, crushed wiring or metal touching the terminals of the wallplate.
This indicates that the controller is in LOCKOUT. This feature of the controller is to protect it against being overused in a short period of time. After a few minutes the controller can be used normally.
This indicates that the controller is in TEST mode. To exit TEST mode press following buttons in sequence: UP, DOWN, STOP, STOP (note that STOP needs to be pressed twice). The TOP LED will go off, and the controller will be in SLEEP mode. To wake the controller, follow the steps from 1) above. It is easy to recover from TEST mode; however this fault should be reported to OZRoll.
The charging condition of the Controller can be checked at any time that some form of charging is occurring. This is done by pressing all three buttons (ie Up, Stop and Down) all at the same time, for 3 seconds. If the battery is full and does not need charging the CHARGE LED will display one 3 second flash.
If the Controller is connected to an AC Adaptor (ie a charger) and charging is occurring the CHARGE LED should flash 7 times when the all 3 buttons are pressed at the same time.